
Screenshots are a great way to share what’s on your screen. Whether you’re trying to report a bug, show off your high score, or simply share a funny meme with a friend, a screenshot can save you a lot of time and hassle.
As a software reviewer, taking screenshots is an essential part of my job. On any given day, I might need to capture dozens of images to illustrate my points.
But, I was surprised to know that a lot of people don’t know how to take a screenshot on their laptops. A few Sony laptop users even told me they thought it wasn’t possible to take screenshots on their machines. Therefore, I have decided to write this short guide showing you how to take screenshot on Sony laptops.
Taking screenshots on a Sony laptop is quick, easy, and requires no special skillset. Here are a few common methods:
Method 1: Using the Print Screen key

This is the most popular and well-known method of taking screenshots. If you observe the keys on your laptop keyboard, you’ll likely see a “print screen” button (often abbreviated as “PrtScn”). To take a screenshot using this method:
1. Make sure that the desired window or application is open and visible on your screen.
2. Press the “Print Screen” key. This will take a snapshot of your current screen and copy it to your clipboard. If you want to only copy the active window (as opposed to the entire screen), you can hold down the “Alt” key while pressing “Print Screen.”
3. Open up an image editing program (like Microsoft Paint, GIMP, or Adobe Photoshop).
4. Press “Ctrl+V” to paste the screenshot into the program.
5. Save the file as a .png or .jpg image.
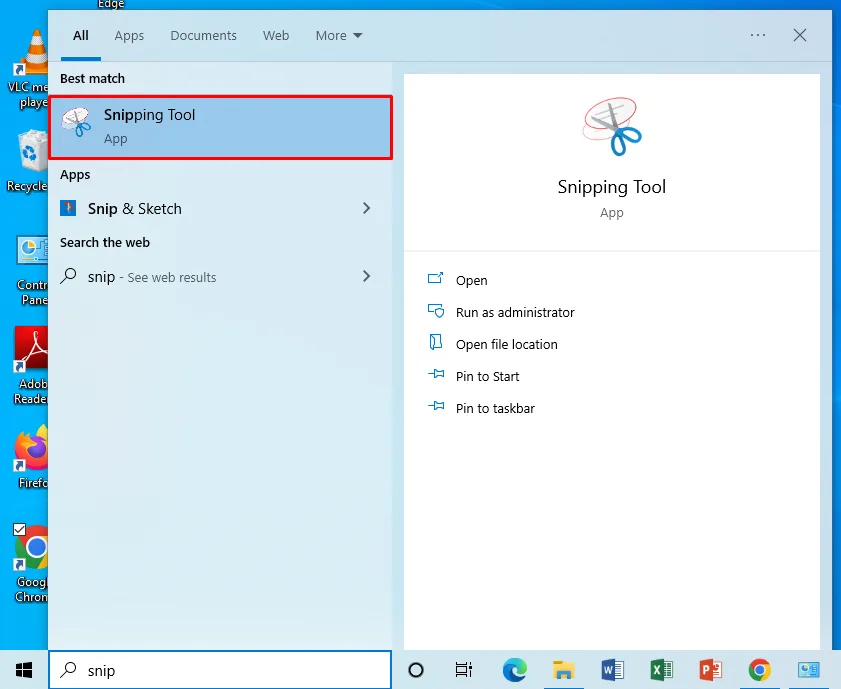
Method 2: Using the Windows Snipping Tool
I have seen a lot of laptop users using third-party screenshot tools like Snagit, but did you know that Windows actually has its own screenshot tool built-in? It’s called the “Snip & Sketch,” and it’s great for taking quick screenshots of specific areas of your screen.
With this software, you can select which type of screenshot you want to take (fullscreen, specific window, rectangular area, or freeform area) and even annotate or crop your screenshot before saving it. Here’s how to use the Snip & Sketch tool:
1. Press the “Windows+Shift+S” keys on your keyboard to open the Snip & Sketch tool.
2. After the Snip & Sketch window appears, select the type of screenshot you want to take. Use your mouse to select the desired area of your screen, then release the mouse button to take the screenshot.
3. Then, you will get a notification asking if you want to open Snip & Sketch. Click “Open Snip & Sketch” to edit your screenshot. From here, you can annotate, crop, or save your image as desired.
Method 3: Using the Windows+PrtScn Shortcut
If you don’t want to use the Print Screen key or the Snip & Sketch tool, there are a few other keyboard shortcuts you can use to take screenshots on your Sony laptop.
To take a screenshot of your entire screen and save it as an image file, press the “Windows+Ctrl+PrtScn” keys on your keyboard. This will take a screenshot of your entire screen and automatically save it as a .png file in your “Pictures/Screenshots” folder.
And if you press Alt in combination with the “Windows+PrtScn” shortcut, it will take a screenshot of your active window and copy it to your clipboard. From here, you can paste it into an image editing program and save it as desired.
Method 4: Using the Windows Game Bar
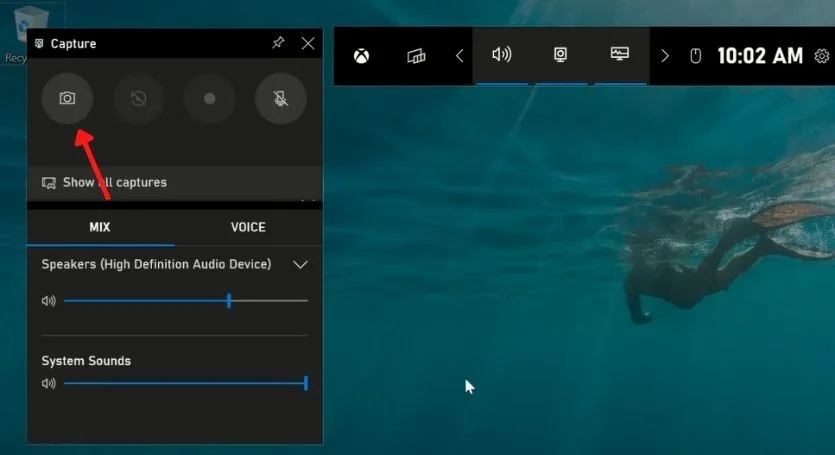
The Windows Game Bar is a built-in software tool that allows you to record or take screenshots of your in-game gameplay. It’s a great way to capture those amazing moments or funny glitches that happen during gameplay, and you can even share your recordings with other gamers on social media.
Fortunately, taking screenshots with the Windows Game Bar is quick and easy. Just make sure that the game you want to screenshot is open and running, then press the “Windows+G” keys on your keyboard to bring up the Game Bar.
Click on the “Take a Screenshot” icon (it looks like a camera), and your screenshot will be automatically saved to your “Videos/Captures” folder.
Method 5: Using a third-party software
For this article, I have tried not to focus too much on third-party screenshot tools. But there are a few that I think are worth mentioning, as they offer features that the built-in Windows tools don’t have.
For example, Snagit is a great tool for taking screenshots of specific areas or windows on your screen. It also allows you to record your screen, edit your screenshots, and even share them online.
If you are looking for a more robust screenshot tool, then I highly recommend Snagit. But if you just need a basic tool for taking quick screenshots, then the built-in Windows tools should suffice.
Also, there are software like Lightshot, PicPick, and Greenshot, which provide more annotation features for your screenshot images.
Final thoughts
There you have it. Now you know how to take screenshot on Sony laptops. Whether you want to use the built-in Windows tools or third-party software, there is a solution that will fit your needs. So go ahead and experiment with the different methods to see which one works best for you.
I hope that, with this article, you have all the information you need. If you have any questions or comments, please feel free to leave them down below.
Thanks for being with us 🙂
![Read more about the article [FIXED] Laptop Power Light On But Nothing Happens (2022)](https://technoqia.com/wp-content/uploads/2022/01/LAPTOPS-BATTERY-39-300x163.webp)