
Mechanical keyboards are famous for their extreme performance and comfortability. If you have been using a mechanical keyboard, you will agree that switches of a mechanical keyboard play a significant role in its performance.
Mechanical keyboard switches are the most popularly used switches in gaming keyboards. Based on the basic principles of switch design, mechanical keyboard switches have a closed and a sprung structure. These switches are typically made of metal and have a very smooth action. Moreover, the whole performance of a keyboard depends on its switches.
Therefore, it is essential to take proper care of the keyboard switches for better performance.
While mechanical keyboard switches are built with a high degree of durability and stability, they can also be tricky to maintain. Also, cleaning a mechanical keyboard is not as simple as it may seem. You may be tempted to be lazy and buy a new one.
That’s why, in this article, I will explain to you how to clean mechanical keyboard switches. If you follow this guideline correctly, you will be able to clean your keyboard switches without breaking them.
So, without further talk, let’s get started.
Why should you clean your mechanical keyboard switches?
The keyboard is one of the main hardware of a computer, and switches are the heart of a keyboard. They are responsible for taking input from the user and processing the commands it receives. The overall performance of a keyboard depends on its switches.
As I said earlier, mechanical keyboard switches are built with a high degree of durability and stability. Also, mechanical switches are durable enough not to break or wear out quickly. But the real problem is, over time, dust and grime build up around your keyboard switches, which cause the keyboard to be less responsive and affect its performance.
Therefore, if you want to get the most out of your expensive mechanical keyboard, it is crucial to clean your keyboard switches thoroughly. If you perform regular maintenance to your keyboard, then it will last for a couple of years than average. Also, cleaning your keyboard makes the keyboard serve better.
Sometimes with repeated usage, some keys become very sticky, and it feels very irritating when you press those keys. Cleaning your keyboard frequently can solve this problem and help to maintain your keyboard hygiene. Also, it will enhance your experience with the keyboard.
steps to clean mechanical keyboard switches
A clean mechanical keyboard is a must if you want to perform to your maximum potential as a gamer, streamer, or just have an excellent typing experience. Therefore, in this section, I will teach you how to clean your mechanical keyboard and its switches the right way.
So, follow the steps below carefully to clean your keyboard switches without damaging the keyboard.
1. Unplug the keyboard
Before starting the process, you need to turn the mechanical keyboard off and disconnect it from its power source. If you are using a wireless mechanical keyboard, then removing the batteries from the keyboard will suffice.
This step is essential because cleaning the keyboard while it is connected to a power source can be harmful to you and your keyboard. That’s why make sure you turned off the keyboard properly. Also, if you have been using the keyboard continuously for a while, it will be better to cool down before you begin with the primary process.
2. Take a clear picture of your keyboard
Once you are done unplugging and disconnecting your keyboard from the power source, now take a clear photo of your keyboard with your smartphone.
You may think, “Why should I take photo of my keyboard?”. Well, you should take a picture of your keyboard because in the next step, you will be removing the switches of your keyboard, and the photograph will help you know which keys go where.
3. Remove the switches
Removing mechanical keyboard switches is a pretty straightforward task.
If you have a keycap puller, then use it to pull your keyboard switches. Otherwise, you can remove the keycaps very easily by wrapping floss around the base of the key. Also, you can use a flat-head screwdriver to pull your keyboard switches—store all the keycaps in a bowl.
To avoid breaking the keyboard or any keycap, you should go through your keyboard’s instruction manual on removing the keys. Most of the time, manufacturers suggest pulling the switches upward from a specific point and angle to avoid breaking them.
4. Clean switches with compressed air
Once you have successfully pulled all the keycaps, you have full access to all the switches under the keycaps. You will notice dust and debris around the switches.
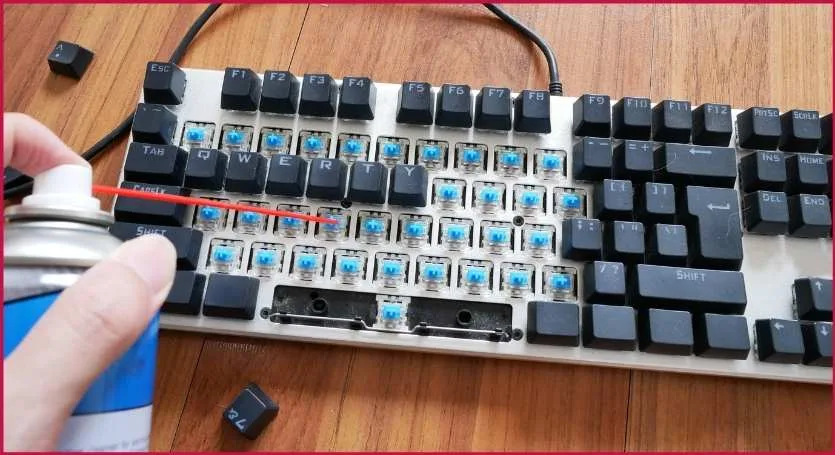
To clean this exposed dust, you have to use compressed air. Take a can of compressed air and spray on the switches with short bursts. Target visible dust and debris first and try to spray from every angle so that you can get the best results. But make sure you keep the nozzle at least 3-4 inches from the switches to avoid damaging them.
Keep doing this for a while and try to clean as much dust as possible. Also, make sure you are not sending the dust back to switches.
5. Wash your keycaps
If your keycaps look dirty and dust accumulated underneath your keycaps, it will be better if you wash them properly in a colander with water. You can also clean them in a dish soap and water solution.
After washing your keycaps, wrap them with a towel and let them dry completely.
6. Leave the components to dry
It is essential to let the keycaps and switches of your mechanical keyboard dry entirely before reassembling the keyboard back together. Otherwise, the remaining water or cleaning solution on the components can damage the keyboard internally.
If you keep the components exposed to air and sunlight, it will take around an hour or two to get every component dried up completely.
7. Reassemble the keyboard back together
When you feel like all the components of your keyboard are has completely dried up, now it’s time to reinstall all the keycaps back together. To avoid any confusion or error, place the keycaps according to your previously taken image.
Make sure you don’t apply extra pressure while inserting the keycaps.
how to clean sticky keyboard without removing keys?
A keyboard is one of the crucial components of a computer that I use every day until it stops working. Over time, the keyboard accumulates crumbs, grime, debris, fungus, and dust underneath the keycaps. The best solution to this problem is to clean the keyboard by removing keycaps and switches.
But the problem is, not all keyboards out there have removable keys. Also, some keyboards require special tools to remove keycaps and easily break your keyboard if you don’t know the right way to open a keyboard. Or, sometimes, you may be tempted to clean your keyboard by removing keycaps. Therefore, you should learn how to clean a sticky keyboard without removing the keys.
First of all, disconnect the keyboard from its power source for safety. Then, take your compressed air can and spray the keyboard with a short burst to blow out dust and debris from the spaces between the keys. Keep doing this for a while and try to remove as much dust as possible. If you notice any large object under the keys, scrape the object out using a toothpick.
After that, wipe your keyboard’s surface with a cleaning solution, like isopropyl alcohol. The cleaning solution will remove all the sticky residue from the keycaps and will prevent future sticking. If you don’t have any cleaning solution, you can use water instead.
Now test your keys by pressing them repeatedly. If they are still sticky, then you will need to lubricate them. Press the keycap’s lever firmly and apply a drop of lubricant to the base. Then release the key and press the key a few times to incorporate the lubricant. Use a microfiber cloth to wipe out the extra lubricant.
TIP: Try to keep your palms sweat-free and fresh while gaming by using sweatproof mouse and keyboards.
how often should you clean your keyboard?
It depends. If you use your keyboard regularly, it is recommended to clean it every week because a dirty and sticky keyboard can affect your productivity.
Cleaning a mechanical keyboard is pretty straightforward than other keyboards. You don’t have to always deep clean the keyboard; you can even clean your keyboard without removing any keys. It takes only 7-10 minutes to clean a mechanical keyboard without removing its switches. But, it will be better if you do a proper deep clean of your mechanical keyboard at least once every month.
A proper clean can increase your typing accuracy and keep dirt, dust, and fungus away from your keyboard. So, it would be best if you tried cleaning your mechanical keyboard frequently. But, make sure you don’t overdo it.
how to maintain a keyboard?
Here are few tips to help you perform better maintenance of your keyboard –
1. Clean your keyboard
If you want to get the most out of your keyboard, you have to perform regular maintenance on your keyboard. Also, cleaning a keyboard frequently extends its lifespan and makes it perform better. So, try to clean your key properly at least once every week.
2. avoid eating near the keyboard
Most of the people are used to eat and drink on their computer desk. And many a time, small pieces of food fall on the keyboard and get stuck, stopping one or more keys from functioning properly. Also, typing with sticky or hand hands makes the keycaps sticky. Therefore, you should eating or drinking near your keyboard.
3. Cover your keyboard after use
Dust and fungus are the biggest enemies of a keyboard. They can easily accumulate underneath the keycaps and harm the circuit, leading the keyboard not to function properly. So, try to cover your keyboard when you are not using it to avoid dust particles.
4. Press keys gently
Pressing the keys gently can extend the lifespan of a keyboard for extra few years. Also, pressing the keys softly while typing can help you increase your typing speed. Therefore, try to press the keys of your keyboard as softly as you can.
Also, try position your keyboard according to your elbow posture to avoid tennis elbow.
Final thoughts
Cleaning your mechanical keyboard’s switches is crucial if you work all day long with it. But most people don’t know the proper method.
Therefore, in this article, I have shown how to clean mechanical keyboard switches without removing them. But, it would be best if you did not overdo it. It will be more than enough if you perform light cleaning once every week. I also shared how you can maintain your keyboard to extend the lifespan.
Hopefully, you learned something new from this article. Thanks for being with us 🙂
Read: